Sunday, December 6, 2009

Playing with Food for Christmas


I know, I know, we're always told not to play with our food. Most of the time that's true. When it comes to crafty ministry, though, you'll find fun ways to play and have a tasty treat.

Snowman Cake

Long before all of the fancy shaped pans were available, cake mix companies offered ideas for cutting layer cakes to create fancy shapes. This was always one of my favorites, because I love coconut cake. It makes a lovely presentation, and serves a good sized group.

Supplies
* White cake mix or recipe for two-layer cake (two boxes or recipes)
* Fluffy white frosting (enough for the double cake recipe)
* Shredded coconut (optional if allergies are a concern or you just don't care for coconut)
* Gum drops for features and buttons
* String type red candy (licorice, Twizzlers or Red Vines) for scarf
* Nine-inch cake pans (two)
* Muffin tin (one tin of six or twelve holes)

Step 1

Cover a platter or cutting board with aluminum foil, waxed paper or any desired food-safe covering.

Step 2 - Baking


Prepare the pans as directed by the cake mix or recipe. Make one box or recipe of cake batter.  Fill one muffin hole half-full and set aside. Divide the remaining batter between the two cake pans. Bake and cool as directed. Repeat with the second batch, except bake the two muffins as well. (Note: If you have sufficient pans and a large enough oven, feel free to do all of the mixing and baking as one step.)

Step 3 - Assemble layers

Level two of the layers across the top.  Spread frosting on these two layers. Add a plain layer to each of the frosted layers.

Step 4 -  Shaping the snowman


Cut a shallow arc from the side of the two cakes. Make the arcs as equal as possible because these will become the arms. Frost the cakes along the cut line.


Place the cakes as shown in the diagram - cut side to cut side - to form the snowman's body. Frost the top and sides of the cakes.

Trim the muffins as necessary to form the head and be the same height as the body. Frost the layers of muffin together.  Place it at the top of the snowman's body. Frost head.

Align the cut arcs on the sides to form arms and frost in place.


Step 5 - Dressing the snowman

If you are a coconut nut, as I am, this is the time to sprinkle on lots of coconut snow.

Use gumdrops to form the facial features, for example, a line of red ones for the mouth, an orange one for the nose, green ones for the eyes. Black gumdrops make great buttons on his chest. Form a scarf from string-type candy such as licorice whips, Twizzlers or Red Vines.


And there you have it, a snowman layer cake ready to brighten your table and your palate.

Miscellaneous tips:

If your crowd isn't large enough to need the two-layer version, just use one box of mix or recipe and make it a sheet cake. Don't level the layers - the dome effect makes it look more like a three-dimensional snowman.

Other candies can be used to decorate - basically anything round and colorful will fill the bill.


Individual Snowmen

Little individual snowmen make fun party favors, desserts, place cards or projects for kids at a party.

Supplies
Regular sized marshmallows
Miniature marshmallows
Food coloring
Graham crackers
Toothpicks


Pretty simple to assemble: skewer two regular and one miniature marshmallow on a toothpick. Use a toothpick dipped in food coloring to add features. Two more toothpicks form the arms. Stick the end of the toothpick holding the snowman together into a graham cracker.


Add more miniature marshmallows around the base for stage-setting.

Miscellaneous tips:

For very young children, use uncooked spaghetti instead of toothpicks.

Use white frosting to cover the graham cracker and secure the snowman in a fluffy field of white. (You can add coconut, too!)

Dots of hot fudge ice cream sauce (but not heated) work as features and buttons.

Use cupcakes instead of graham crackers to make the little snowmen even more festive.

John 3:16 Poster

This time of year can become a little crazy, and it's easy to lose sight of what we celebrate. I first made this poster more than 40 years ago.

I was away at college and there was a door decorating contest in the dorm. I had no decorations with me and no money to buy any. What I did have was a shallow box, just the right size to hold a piece of paper bearing John 3:16, the description of the first, best and most precious Christmas gift ever given. While I didn't win the contest (and didn't expect to when I saw the many fancy tinsel and ribbon decorations around the dorm), I did feel good about the number of people who thanked me for the reminder.

These days, I have word processing and desk top publishing to help me make the poster fancy, but it doesn't change the importance of the content.


This one was created in Microsoft's Publisher 2007. You can create one in virtually any publishing or word processing program you may have. You can add artwork or a different background, change to whatever font you prefer - make it your own vision of God's Gift.

If you're short of time, here is a .pdf version you can download and print: John 3:16 Poster

Have a most blessed Christmas!

Reindeer Games

Candy Cane Reindeer


What would Christmas be without reindeer? Bring Santa’s team to your party or table display with just a few minutes work. They are also adorable peeking out of Christmas stockings.

This is another of those projects I’ve been doing for nearly 40 years and don’t remember where I first learned it. Have fun!

Supplies:


* Full-sized, individually shrink-wrapped candy canes (approximately ½ ounce each and measuring 5 to 6 inches long) – 1 per reindeer (but get a few extra to allow for breakage)
* Pipe cleaners, aka chenille strips, in a shade of brown – 9 to 10 inches per reindeer
* Glue-on eyes – 2 per reindeer
* Chenille poms – 1 per reindeer (I like the 10mm size)
* School glue or craft glue
* Scissors or wire cutters
* Ruler

Step 1


Cut the pipe cleaner into three pieces: one measuring 5 inches and two measuring 2 to 2-1/2 inches each. These will be the antlers. Bend each piece in half.

Step 2


Place the bend of the 5 inch piece of pipe cleaner under the crook of the candy cane. Bring the two free ends of the pipe cleaner above the candy cane and twist tightly together where they cross the cane.

Step 3


Place the free ends of the pipe cleaner horizontally at 90 degree angles to the pipe cleaner. Bend the ends up by 90 degrees to form the antler base.

Step 4


Twist a 2 inch piece of pipe cleaner at the bends of the antler base. Bend each of those ends to 90 degrees, at a 90 degree angle to the base.

Step 5


Glue two eyes on the short side of the candy cane, about ¾ of the way to the curve. Glue a chenille pom for the nose.


Miscellaneous tips:

The pipe cleaners I bought were about 12 inches long. So cutting 5 and 2 inch pieces gave me two 5 inch and one 2 inch piece, or six 2 inch pieces per strip. Mix and match as necessary to get the most without waste from your pipe cleaners.

Poke holes in a piece of Styrofoam or the back of the empty candy cane box to stand your reindeer for safekeeping as the glue dries.

The antlers don’t have to be perfect – if you have children helping you with this project, don’t get hung up on the angles.

Chenille poms come in all sorts of combinations. I had a bag of assorted colors and sizes from other projects, and I purchased a bag of the 10 mm black poms.

Because of the small pieces, use caution around very young children. You may prefer to dab eyes and a nose on the wrapper with acrylic paint for little ones.

Thursday, November 12, 2009

More Thanksgiving Ideas

Thanksgiving brings with it lot of images of turkeys and Pilgrims. Here are some ideas for Thanksgiving crafts to help you entertain the little Thanks-givers.

Supplies:
Construction Paper
School glue or glue stick
Pencils
Crayons
Safety scissors
Apples, oranges or styrofoam balls
Cheese cubes
Toothpicks or uncooked spaghetti
Marshmallows, full-size and miniature
Candy corn


Snack time:
Make little turkey treats with marshmallows: Use a full-sized marshmallow or two as the body. Thread miniature marshmallows on toothpicks or uncooked spaghetti pieces (for younger children) for the tail feathers. Use a single miniature marshmallow as the head and a piece of candy corn for the beak. Cut a marshmallow in half to serve as the wings and two pieces of candy corn for the feet. Try to enjoy it for a moment or two before devouring!


If you can find the multicolored marshmallows, they make a fun display. Or roll plain ones in cocoa powder for a brown turkey. If your turkey seems a little "tail heavy," prop it with a toothpick in back.


Larger turkey treats can be formed on apples, oranges or styrofoam balls for the body. Thread cheese cubes on toothpicks for the tail feathers. Attach a small triangle of cheese to a single cube to form the head and beak.


Just a caution: this works much better with medium cheddar (or something with a similar smooth texture) than sharp cheddar. Witness the disaster below:

Sharp cheddar is a little too crumbly to make neat cubes. So you can learn from my mistake - LOL.

Pilgrim buckles:
Cut rectangles of gold (or yellow) or silver (gray) construction paper. Cut two openings in it to form a simplified buckle.

Print a scripture or scripture reference about thanks along the outer edges. Cut a strip of black or dark blue construction paper and thread through the center.


Secure with a small piece of tape or a dot of glue on the back. These make nice little bookmarks or place cards for the table. The blue or back strip provides a good surface for a small sticker, if desired. Make them as large as you would like. My sample is about 3.5" by 4.5" for the buckle size and 2" X 9" for the strip inside.

Test your writing implement on a sample of the paper before starting the lettering. The marker I used wasn't quite as fine a tip as I would have liked. It worked - it just wasn't as tidy as I hoped it would be.

Drumsticks for all:
Cut out construction paper drumsticks, large enough for a scripture verse or reference on one side. On the other side, you might put the person's name or have each person write something for which they are thankful.


You can get several from a single sheet of paper if you reverse every other one. A template for five to an 8.5" X 11" page is here: Drumsticks Template

These make great bookmarks or place cards as well. And everyone at the table can have a drumstick!


Turkey Time - Handprint Turkeys

Ah, the handprint turkey! Is there anything more personal for little ones to do at Thanksgiving? Choose the appropriate activity level for your group.

Supplies:
Paper - plain white paper to trace on
Construction paper - to cut out feathers and other features; to mount finished pictures on
Crayons
School glue or glue stick
Finger paint
Watercolors
Assorted glitz - sequins, glitter and such


To begin:
Have each child open one of his or her hands as far as possible. Trace the hand on the white paper with a crayon. Older children may want to trace their own hand. For very young children, you can make photocopies of a hand you traced from an older child.


The thumb will be the turkey's head; the other fingers serve as the tail feathers and the hand itself is the turkey's body.

Very young children:
Draw wings on the body. Draw eyes, a beak and wattle on the head. Add feet. Let the children color the bird.


Youngsters:
(Adults should pre-cut construction paper features for the birds.) Glue construction paper tail feathers on the tail. Glue a yellow beak and a red or pink wattle on the head. Draw in eyes, feet and wings. Color as desired.

Any age that enjoys getting messy:
(With thanks to Dr. Karen Romito of HobbyTown USA in Folsom, CA) Put finger paint on the hand and fingers in a variety of colors. Place the hand down on the paper and move the four fingers (but not the thumb) back and forth a little to create a fan of colored tail feathers. Draw in any additional details after the paint dries.


Older children:
Using safety scissors, cut features for the turkey from construction paper. Glue them on as desired and use crayons to color the other parts.


Here's a picture of a real feather, if you'd like to use that:


You can download the image here: Feather Photo


Feel free to get creative within your group's abilities with things like glitter, water colors (use water color paper to start rather than copy paper), colored pencils or other decorating techniques. This is a very adaptable project, suitable for a wide variety of time frames and skill levels.

Some ideas for incorporating "Thanks" into the project:
Have the children print something or someone they or thankful for on each tail feather (or have an adult print it for them);

Have them print an appropriate scripture reference or passage at the bottom of the picture. Some options are:
I Chronicles 16:8
I Chronicles 16:34
I Chronicles 29:13
Psalm 30:4
Psalm 69:30
Psalm 75:1
Psalm 92:1
Psalm 95:2
Psalm 100:4
or have older children find their own verses;

Have them address the picture to someone they are thankful to and give it to that person as a thank you gift.

Saturday, October 24, 2009

Things to Save for Crafty Ministry

The idea of shoestring ministry is to make the best use of the resources God has given us. Recycling items rather than purchasing is good stewardship. Sharing from our abundance is showing love. Keeping stuff out of landfills is caring for the earth God gave us.


To share with shelters:
First, the golden rule of ministering on a shoestring – never turn down something free; never leave behind something you paid for.


Those little soaps and cosmetics from hotels – you may have brought your own, but someone in a homeless shelter or safe house can use these personal care supplies.

Sample sizes of nearly anything – food samples can go to food ministries; child care items help crisis pregnancy centers and homeless shelters; personal care items can go to homeless shelters or safe houses; pet care items to humane societies or pet rescue organizations.

For crafting projects:
The silver rule of ministering on a shoe string – clean thoroughly if there is any chance that food stuffs or human fluids (such as saliva) have been in contact with the surface. A good wipe down or wipe out may serve for some items. Others need soap-and-water washing or even soaking for a little while in a mild bleach solution. Safety first!


As I add projects to the blog, I’ll place links under the appropriate item used in the project. I’ll be happy to add links you might suggest in comments, as well. This document will be an ever-changing resource for you.
If you have space to store saved items, you’re ahead of the game. Class leaders may want to consider asking parents each to submit the item or items for their own child, if they can’t come up with enough of a needed item on their own.

Bottle caps (with thanks to Crafts for the King!): Musical instruments


Cardboard inserts

Cardboard rolls from toilet tissue, paper towels, food storage wraps and wrapping paper: Cardboard tube crafts; Musical instruments

Coffee cans and tubs, with lids (wash and air dry thoroughly): Musical instruments

Cotton from aspirin bottles


Dryer lint


Empty soda and milk containers (wash and air dry thoroughly): Musical instruments

Empty tissue boxes: Musical instruments

Fabric and trim scraps

Hinged boxes, such as sneaker boxes

Ice cream sticks (wash and air dry thoroughly)

Individual-sized yogurt containers with or without lids

Milk jug rings

Nature magazines

Newspapers and ads printed on newsprint

Old socks and nylons


Out-of-date calendars

Plastic drink cups from restaurants

Plastic lids to discarded containers (Wash and air dry thoroughly)

Ribbon scraps

Salt containers

Small boxes, including cigar boxes

Small jars, including baby food jars (wash and air dry thoroughly)

Styrofoam meat trays (wash and air dry thoroughly)

Styrofoam packing pieces

Twist ties

Yarn scraps


If you have items to add to the list, please tell me in a comment. I’ll add it and credit your suggestion.


Wednesday, October 21, 2009

Ghosties and Ghoulies - Halloween Ideas

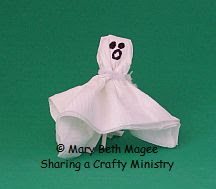
October brings Halloween, and with it the presence of little ghosts (friendly and otherwise) for parties and activities. Here are some quick and easy ghost ideas.


Supplies:
White napkins (paper to give away or fabric to last) or white facial tissue – up to 2 per ghost
Thanks to CraftsfortheKing - Any white fabric or handkerchief will work
White yarn or pipe cleaners, cut in six inch lengths
Crayons or markers
Round head lollipops (optional)
Cupcakes (optional)
Popcorn balls (optional)
Styrofoam balls (optional)
Balloons (optional)


Let’s start with party activities:
Give each child two napkins. Have them wad one up in a ball (Watch the fun as they squeeze and shape the napkins!).

Center the second napkin over the first and gather around the balled up napkin. Tie with white yarn or a white pipe cleaner to form the ghost’s neck.


Use crayons or markers to draw eyes on the ghost’s face. (Younger kids might do better to draw the face near the center fold of the second napkin before wrapping it.)

Presto! There’s a little ghost to take home as a remembrance of the party. (Special thanks to Dr. Karen Romito of HobbyTown USA in Folsom, CA for reminding me of this activity!)

Working with children in the sticker-crazy phase? Use colored sticker dots as the eyes.


Party favors:

Center a quarter-folded paper napkin over the head of a round lollipop and tie under the head to make ghosts that can stand up in a piece of Styrofoam. It’s a tasty little party favor that serves as a decoration in the meantime.


As dessert:
Stand the lollipop ghost in a cupcake to make individual desserts/decorations for your party attendees.

Wrap a napkin around a popcorn ball (wrap it first in plastic wrap) for a larger version of a dessert ghost.


Party decorations:
Add a yarn loop at the top of the ghost’s head to hang the little fellows as decorations. Use the cloth napkins for outdoor décor – they’ll hold up to weather better.

Use balloons to form the heads for a more ethereal look if there will be light shining on them.

Use a Styrofoam ball as the form for the head for a larger ghost decoration. This is a more expensive version, but may be just the centerpiece you need.


Remember, you can adapt these projects to fit your budget, group size and skill level. Please let me know how you use this with your group.

Sunday, October 4, 2009

How to be a Godparent - whatever your denomination

Many baby supply companies offer programs where you can register for samples and coupons for their products. You can begin before the child is even born. In the course of registering, they ask about your relationship to the baby or soon-to-be-born.

I started registering for these sites when a friend asked to stand as Godmother to her baby girl. They remind you of the baby's development and offer suggestions for appropriate toys and activities (mostly their own products, of course) as well as the previously mentioned samples and coupons.

Some of the products weren't appropriate for her baby, so I gave them to my church's ministry in support of the local Right-to-Life organization. They in turn distributed them to families in need.

When my "subscriptions" ran out (when my Goddaughter turned a year old), I realized I would be losing these resources for other children. I have since registered as Godmother to babies several times. Each of the items I receive gets prayed over and a prayer goes with it to the child who will get it. I consider myself Godmother to each of those children, even though I don't know their names.

If your congregation works with an organization dealing with children, you can be a Godparent, too. It's a solemn responsibility, but a great joy.

Blessings,
Mary Beth

BOGOGO -- Buy One-Get One-Give One!

One of the favorite tricks of retailers is to offer a "Buy One, Get One" special. Whether it be "buy one can of soup, get one free" or "buy one pair of shoes, get one at 50% off," the specials are all over. Sometimes you only need ONE. The second item may spoil before you can use it or there aren't any other shoes you need. Whatever the reason, you can turn that special into a ministry opportunity.

Food items: check out your local food pantry. Pretty much anything is needed these days, what with the economy the way it is. So take that second can of soup or gallon of milk or head of lettuce and bring it to your local church or civic food pantry. A few specify only non-perishable items if they have no means to refrigerate, but others will take anything edible.

Shoes, clothes: You may not need an extra pair of shoes or socks or another shirt. Someone does. Look for something practical and serviceable (sneakers are always good in shoes, T-shirts or jeans in clothing) and check your church clothing ministry. Your church doesn't have a clothes ministry? Check Christian radio sites such as MoodyRadio.org or KLOVE.com. They frequently affiliate with missions ministries to collect shoes (ShoesforOrphansSouls.org is one that comes to mind) or garments for those in need.

Knapsacks, backpacks,etc.: Got a free backpack and don't need it? Once again, look for Christian radio stations (and some secular ones as well) who partner with organizations to provide underprivileged school children with school supplies, including backpacks.

Do you see a pattern forming here? If you can get a deal on something you can pass on, it's a BOGOGO! So keep your eyes open for opportunities and places to use them. You'll be surprised how far a little BOGOGO can go!

Blessings,
Mary Beth